Version française plus bas...
(A SYSTEMATIC APPROACH TO LV IN 2D
A systematic approach to obtain the best classical short axis view of the LV with 2D echo.
A) The 3 parasternal classical short axis view are the basal (mitral level), the mid (papillary muscle level) and the apical level.
FIRST CHOICE:
1) Horizontal LV technic: (Ballerina Technic)*
Starting from a long axis view: You need to get a LV cavity as horizontal as possible. The left decubitus position should be extreme, the expiration forceful. Angulate the transducer to the right shoulder, slide near the left sternal border and slide to an upper intercostal space if needed. These technical moves are to avoid a 90 degree rotation on a vertical heart and will allow you to obtain a nice spherical short axis view of the LV for your wall motion analysis. Put the base of your LA in the middle of your screen and turn slowly 90 degree clockwise to get the basal short axis. Return to the long axis and slide to get the mid LV segments in the middle of the screen and turn slowly 90 degree to get the mid short axis view of the LV. Repeat the same steps for the apex.
**We call this ¨¨the ballerina technique¨¨ because often when you turn 90 degree after horizontalisation of your LV only the edge of your transducer is used.
2) Focus LV wall technic:
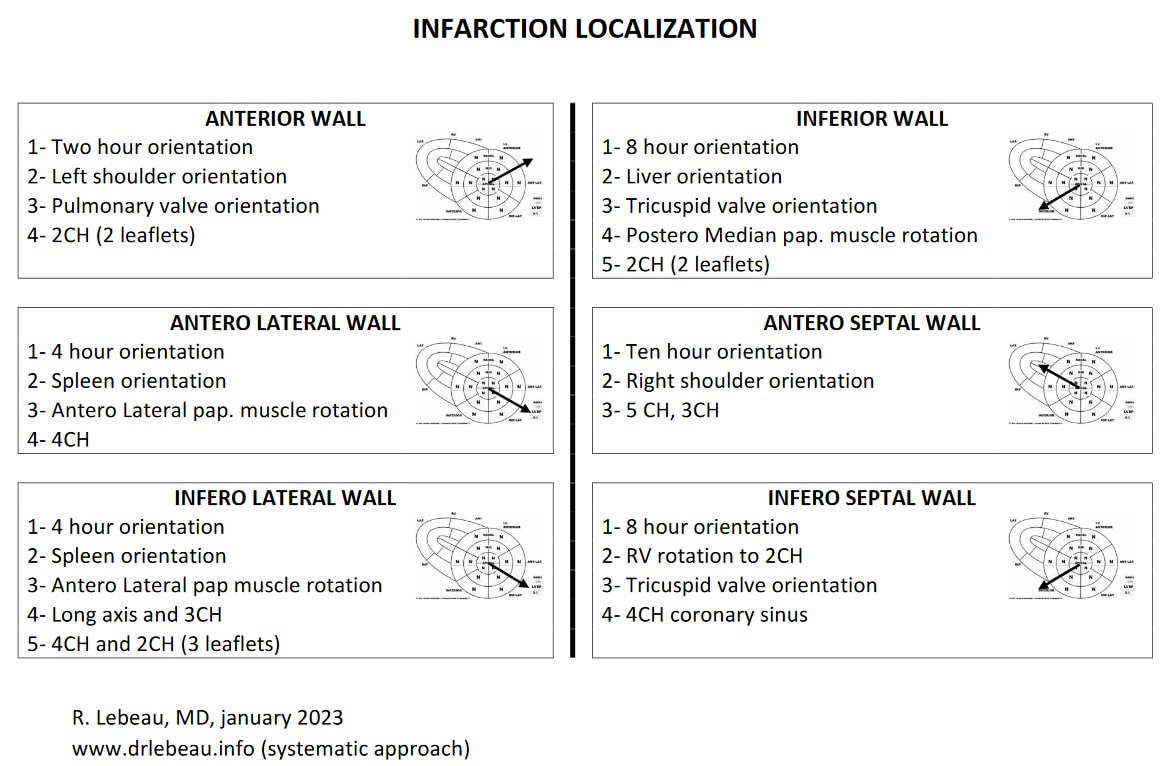
Tricks to get specific evaluation of the 4 walls of the LV: anterior, inferolateral, inferior and septal wall.
For the anterior wall: 2 o’clock (left shoulder orientation)
Start by getting a parasternal long axis view of pulmonary valve (LV apex on the left side of the screen). Slowly turn 90 degree clockwise from the long axis anterior wall to short axis anterior wall.
Follow visually the transformation of the long axis LV anterior wall to the short axis anterior wall and do it back and forth. Keep your eyes on the wall when you do the rotation.
For the inferolateral wall: 4 o’clock (spleen orientation)
Start with a parasternal long axis view but with the apex of the LV on the right side of the screen and turn slowly 90 degree counterclockwise from the long axis inferolateral wall to the inferolateral short axis view.
For the inferior wall: 8 o’clock (liver orientation)
For the anterior septal wall : 10 o’clock (right shoulder orientation)
Put the long axis apex on the left side of the screen and turn 90o clockwise with right shoulder orientation.
SECOND CHOICE:
Subcostal technic
The patient must be in dorsal decubitus and breathe in deeply and hold this breath. Make sure the LV is horizontal by angulating the transducer to the right. Put the base of your LV 4 chamber in the middle of your screen and turn slowly 90 degree clockwise to get the basal short axis. Return to the 4 chambers and slide to get the mid LV segments in the middle of the screen and turn slowly 90 degree to get the mid short axis view of the LV. Repeat the same steps for the apex.
When you get LV short axis reverberation in the subcostal view and see the LV short axis and his mirror image, you should turn the patient in the right lateral decubitus position. When you redo the subcostal short axis view the reverberation will disappear and you will have a focus view on the LV and RV inferior wall that you cannot achieve in the left lateral or dorsal decubitus. The subcostal right lateral decubitus could help for patient with chronic pulmonic disease.
THIRD CHOICE:
Apical technic
Start by getting a classic 4 chamber apical view in the left decubitus position. Move the transducer a space higher on the chest wall without changing the orientation of the transducer. You will obtain a short axis apical view of the LV. From this position, if you move further up one interspace you will get a mid axis view and further up again one intercostal space you will see the basal short axis view of the LV. This technic can be done with right lateral decubitus.
FOURTH CHOICE:
Costal-subcostal technic
Patient may need to hold their breath in deep inspiration. The left lateral decubitus is the best position.
FIFTH CHOICE:
Right parasternal technic (or right costal subcostal technic).
Ask the patient to breathe out. Make sure the patient is positioned as much as possible in the right decubitus position. Start by getting a short axis view at the level of the aortic valve then do a downward angulation to the left to obtain the short axis view of the LV.
B) RV SHORT AXIS
Use the same technic learned for the left ventricle long axis and try to get the RV as horizontal as possible. Get a true 2 chamber view of the RV where you should not see the LV nor the aortic or pulmonary valve. Center your image in the middle of the screen and turn 90 degree clockwise on the edge of the probe. Repeat the procedure for the mid and apical RV. The great advantage of this technic is that your short axis image will be center on the RV. RV apical short axis is the third best choice after PSLA and apical short axis to look the LV apex short axis.
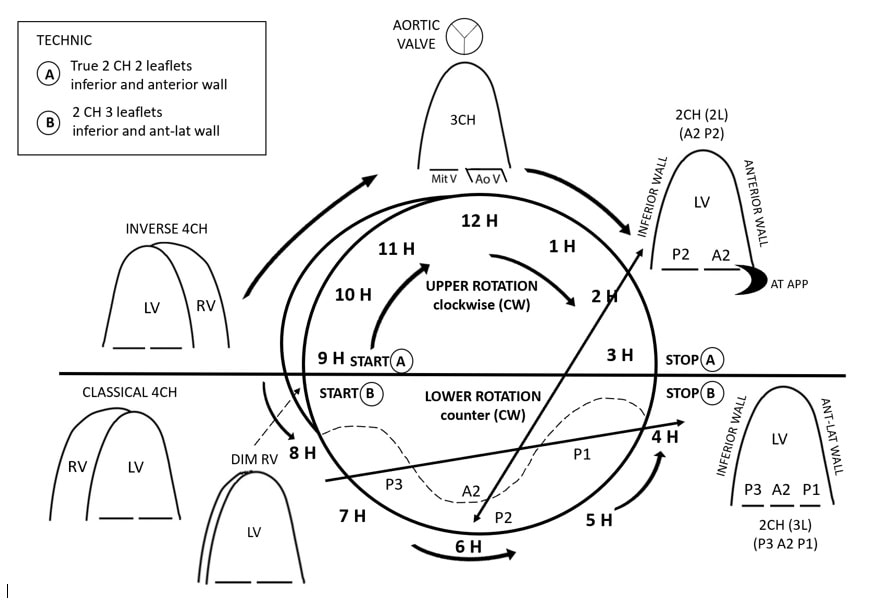
C) True LV 2 CH
Localise your basal short axis. Find the anterior mitral commissure. Once you have localised this site, memorize it. It is usually at 3 o’clock. Return to your 4CH with the LV on the right of the screen then turn slowly counter clockwise to get your 2 chamber. When you first get your LV 4CH with a small RV, you will notice the mitral valve has 3 scallops. If you turn more, you will have a 2CH with 3 scallops, P1, A2 and P3. Turn more, beyond 3 o’clock and you will get a 2CH with 2 scallops i.e. a true 2CH LV. If you turn more, the 3CH will appear with a mitral valve that shows 2 scallops (A2, P2).
The best technic to find the true 2CH is to start from the apical 3CH and rotate clockwise to the get the 2CH 2 scallops.
PS. The best image may be acquired either in inspiration or expiration. For a given patient you must choose which phase of the respiratory cycle gives you the best image. A true revolution in 3D imaging of the LV short axis would be to have a sharp image of the 3 classic short axis view that are derived from the 4CH view of the LV rather than a blurry reconstruction of 9 short axis cut off the LV.
Video: www.drlebeau.info (a systematic approach)
Special thanks to Dr M Di Lorenzo for her precious help and M. J. Beland for his great skills in video production and post-production.
A systematic approach to obtain the best classical short axis view of the LV with 2D echo.
A) The 3 parasternal classical short axis view are the basal (mitral level), the mid (papillary muscle level) and the apical level.
FIRST CHOICE:
1) Horizontal LV technic: (Ballerina Technic)*
Starting from a long axis view: You need to get a LV cavity as horizontal as possible. The left decubitus position should be extreme, the expiration forceful. Angulate the transducer to the right shoulder, slide near the left sternal border and slide to an upper intercostal space if needed. These technical moves are to avoid a 90 degree rotation on a vertical heart and will allow you to obtain a nice spherical short axis view of the LV for your wall motion analysis. Put the base of your LA in the middle of your screen and turn slowly 90 degree clockwise to get the basal short axis. Return to the long axis and slide to get the mid LV segments in the middle of the screen and turn slowly 90 degree to get the mid short axis view of the LV. Repeat the same steps for the apex.
**We call this ¨¨the ballerina technique¨¨ because often when you turn 90 degree after horizontalisation of your LV only the edge of your transducer is used.
2) Focus LV wall technic:
Tricks to get specific evaluation of the 4 walls of the LV: anterior, inferolateral, inferior and septal wall.
For the anterior wall: 2 o’clock (left shoulder orientation)
Start by getting a parasternal long axis view of pulmonary valve (LV apex on the left side of the screen). Slowly turn 90 degree clockwise from the long axis anterior wall to short axis anterior wall.
Follow visually the transformation of the long axis LV anterior wall to the short axis anterior wall and do it back and forth. Keep your eyes on the wall when you do the rotation.
For the inferolateral wall: 4 o’clock (spleen orientation)
Start with a parasternal long axis view but with the apex of the LV on the right side of the screen and turn slowly 90 degree counterclockwise from the long axis inferolateral wall to the inferolateral short axis view.
For the inferior wall: 8 o’clock (liver orientation)
- Put the long axis apex on the left side of the screen but turn 90 degree clockwise from the long axis inferior wall to the short axis inferior wall.
- Long axis RV-LV (tricuspid valve on the left side of the screen) turn clockwise to short axis.
For the anterior septal wall : 10 o’clock (right shoulder orientation)
Put the long axis apex on the left side of the screen and turn 90o clockwise with right shoulder orientation.
SECOND CHOICE:
Subcostal technic
The patient must be in dorsal decubitus and breathe in deeply and hold this breath. Make sure the LV is horizontal by angulating the transducer to the right. Put the base of your LV 4 chamber in the middle of your screen and turn slowly 90 degree clockwise to get the basal short axis. Return to the 4 chambers and slide to get the mid LV segments in the middle of the screen and turn slowly 90 degree to get the mid short axis view of the LV. Repeat the same steps for the apex.
When you get LV short axis reverberation in the subcostal view and see the LV short axis and his mirror image, you should turn the patient in the right lateral decubitus position. When you redo the subcostal short axis view the reverberation will disappear and you will have a focus view on the LV and RV inferior wall that you cannot achieve in the left lateral or dorsal decubitus. The subcostal right lateral decubitus could help for patient with chronic pulmonic disease.
THIRD CHOICE:
Apical technic
Start by getting a classic 4 chamber apical view in the left decubitus position. Move the transducer a space higher on the chest wall without changing the orientation of the transducer. You will obtain a short axis apical view of the LV. From this position, if you move further up one interspace you will get a mid axis view and further up again one intercostal space you will see the basal short axis view of the LV. This technic can be done with right lateral decubitus.
FOURTH CHOICE:
Costal-subcostal technic
- The left costochondral ribs, next to the xyphoid appendage have a low density of cartilage and allow for better ultrasound penetration. Obtain a 4 chamber view from the subcostal position then slide up on the ribs and do a 90 degree rotation until you get a new LV short axis view. This is useful when you get LV reverberation and see in the subcostal view the LV and its mirror image. You can move to the right if necessary as the liver won't interfere with your image.
- Start from the apical short axis and slide toward the sternum.
Patient may need to hold their breath in deep inspiration. The left lateral decubitus is the best position.
FIFTH CHOICE:
Right parasternal technic (or right costal subcostal technic).
Ask the patient to breathe out. Make sure the patient is positioned as much as possible in the right decubitus position. Start by getting a short axis view at the level of the aortic valve then do a downward angulation to the left to obtain the short axis view of the LV.
B) RV SHORT AXIS
Use the same technic learned for the left ventricle long axis and try to get the RV as horizontal as possible. Get a true 2 chamber view of the RV where you should not see the LV nor the aortic or pulmonary valve. Center your image in the middle of the screen and turn 90 degree clockwise on the edge of the probe. Repeat the procedure for the mid and apical RV. The great advantage of this technic is that your short axis image will be center on the RV. RV apical short axis is the third best choice after PSLA and apical short axis to look the LV apex short axis.
C) True LV 2 CH
Localise your basal short axis. Find the anterior mitral commissure. Once you have localised this site, memorize it. It is usually at 3 o’clock. Return to your 4CH with the LV on the right of the screen then turn slowly counter clockwise to get your 2 chamber. When you first get your LV 4CH with a small RV, you will notice the mitral valve has 3 scallops. If you turn more, you will have a 2CH with 3 scallops, P1, A2 and P3. Turn more, beyond 3 o’clock and you will get a 2CH with 2 scallops i.e. a true 2CH LV. If you turn more, the 3CH will appear with a mitral valve that shows 2 scallops (A2, P2).
The best technic to find the true 2CH is to start from the apical 3CH and rotate clockwise to the get the 2CH 2 scallops.
PS. The best image may be acquired either in inspiration or expiration. For a given patient you must choose which phase of the respiratory cycle gives you the best image. A true revolution in 3D imaging of the LV short axis would be to have a sharp image of the 3 classic short axis view that are derived from the 4CH view of the LV rather than a blurry reconstruction of 9 short axis cut off the LV.
Video: www.drlebeau.info (a systematic approach)
Special thanks to Dr M Di Lorenzo for her precious help and M. J. Beland for his great skills in video production and post-production.
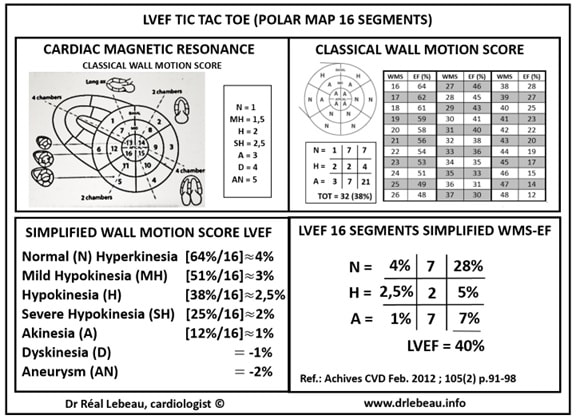
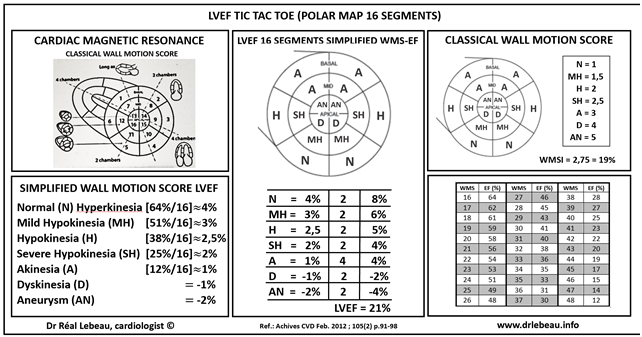
LVEF 16 Segments Simplified WMS-EF
===============================================================================================================================
Une approche systématique pour l’analyse du VG en 2D
Le présent texte propose des suggestions techniques pour obtenir les meilleurs courts axes du VG en écho 2D
A) Les 3 courts axes du VG sont le BASAL (niveau mitral), le MID (muscle papillaire) et le niveau APICAL (l’apex du VG).
Premier choix : A partir du grand axe du VG
Horizontalisation du VG : Débutant par l’acquisition du grand axe classique : on doit horizontaliser le VG au maximum. Le décubitus latéral gauche doit être maximal et l’expiration forcée. Anguler la sonde vers l’épaule droite, glissez vous plus prêt du sternum et monter un espace intercostal plus haut si nécessaire. Avec ces ajustements techniques on obtient un court axe sphérique pour l’analyse du score de contractilité (WMS). L’horizontalisation du cœur permet d’éviter des courts axes oblongs non sphériques tel que retrouvés si la rotation s’effectue sur un cœur vertical. L’étape suivante est de mettre la base du VG ( BASAL ou niveau mitral ) au milieu de votre écran et tourner lentement 90 degré dans le sens horaire pour obtenir votre court axe du VG basal. Par la suite vous retournez a votre grand axe classique et glissez votre sonde en latéral pour mettre la portion moyenne du VG (MID ou muscle papillaire) au milieu de l’écran et vous tournez lentement 90 degré horaire pour obtenir votre court axe des muscles papillaires. Répéter les mêmes étapes pour la section APICALE. Les images peuvent être adéquatement acquises même si vous n’utilisez que le tiers de la surface de la sonde.
Cibler les parois du VG : Voici quelques suggestions pour évaluer sélectivement les 4 parois du VG : antérieure, inférolatérale, inférieure et septale.
Pour la paroi antérieure . : 2 heure * (orientation vers l’épaule gauche)
Débuter en allant chercher un incidence grand axe pulmonaire a partir du grand axe classique ( l ’apex du VG est a gauche de l’écran). Ceci orientera votre sonde vers la paroi thoracique latérale gauche et la paroi septale antérieure du VG. De cette position tournez lentement 90 degré horaire et vous allez obtenir un court axe ciblé sur la paroi antérieure du VG. Suivez visuellement la transformation de la paroi septale antérieure de la section pulmonaire grand axe a celle du court axe de la paroi antérieure du VG. Répéter la transformation ``aller- retour`` pour trouver la meilleur rotation. Il est très important de suivre la paroi du regard lorsque vous faites la rotation.
Pour la paroi inférolatérale. : 4 heure (orientation vers la rate)
Débuter par un grand axe classique inversé avec l’apex du VG du côté droit de l’écran , ceci orientera votre sonde en thoracique latéral gauche . Par la suite tournez lentement 90 degré antihoraire en visualisant la transformation de la paroi inférolatérale du long axe du VG en inférolatérale court axe du VG.
Pour la paroi inférieure. : 8 heure (orientation vers le foie)
Débuter par un grand axe classique avec l’apex du VG a gauche de l’écran .Orientez la sonde en latéral droit et tournez lentement 90 degré horaire en suivant visuellement la transformation a l’écran du long axe de la paroi inférieure du VG a la paroi inférieure court axe du VG. Effectuez des allers-retours pour trouver la meilleure image.
Pour le septum antérieur. : 10 heure (orientation vers l’épaule droite) .
Obtenez un grand axe classique. En visualisant le septum antérieur du grand axe tournez a 90 degré horaire en orientant la sonde vers l’épaule droite. Vous suivrez ainsi la transformation du septum antérieur grand axe du VG a la paroi septale antérieure du court axe du VG. Effectuer des allers-retours pour bien cibler votre paroi septale antérieure.
Deuxième choix :
A PARTIR DU SOUS COSTAL
Le patient doit être en décubitus dorsal , inspirer profondément et retenir sa respiration en inspiration profonde. Assurez vous que le 4C sous costal est horizontal en orientant la sonde vers l’épaule droite pour éviter des courts axe du VG oblongs c'est-à-dire non sphériques dont l’interprétation serait techniquement moins fiable .Puis mettre la base de votre 4C sous costal au milieu de l’écran et tournez lentement 90 degré horaire en visualisant la rotation du VG 4C long axe au VG court axe basal. Retournez au 4C sous costal classique et déplacez la sonde en latéral pour mettre les muscles papillaires au centre de l’écran et effectuez votre rotation 90 degré horaire pour obtenir votre court axe du VG au niveau des muscles papillaires (MID). Répétez les mêmes étapes pour l’acquisition de l’apex du VG i.e. : court axe apical sous costal.
Chez les patients avec réverbération et dédoublement du VG court axe occasionnellement visualisé en sous costal on peut contrer cet artéfact technique en tournant le patient en décubitus latéral droit le dédoublement va disparaitre. Un grand avantage du sous costal en décubitus latéral droit est que vous allez obtenir une excellente vue de la paroi inférieure du VD et VG que vous n’avez pas en décubitus dorsal ou latéral gauche. Le sous costal droit peut aussi aider pour les patients avec maladie pulmonaire chronique.
Troisième choix :
A PARTIR DES SECTIONS APICALES
Débutez par l’acquisition du 4C apical classique (le VG est a droite de l’écran) en décubitus dorsal ou latéral gauche (généralement en expiration) puis en gardant la même orientation de la sonde montez d’un ou deux espaces intercostaux plus haut sur le thorax et vous allez obtenir facilement un beau court axe du VG 4C apical ( APICAL). Par la suite de cette position montez un espace plus haut sur le corps du VG et vous allez obtenir un court axe au niveau des muscles papillaires (MID) .Continuez de la même façon en montant d’un espace intercostal plus haut et vous aurez un court axe de la portion basale du VG (BASAL). Cette technique peut être effectuée le long du bord sternal gauche en décubitus dorsal et même décubitus latéral droit chez les femmes avec des seins volumineux qui empêchent un examen facile du trans-thoracique apical.
Quatrième choix :
A partir du costal-sous costal
Le cartilage costal du sternum bas droit ou gauche près de l’appendice xiphoïde est d’une densité osseuse moindre que les os de la cage thoracique et permet une pénétration relativement bonne des ultrasons a la recherche d’ images échocardiographiques. En partant d’une position en décubitus dorsal et d’une image classique 4C sous costal centré sur la base du VG , effectuez votre rotation horaire de 90 degré et vous obtiendrez un court axe du VG basal . Conservant la même orientation montez sur le grill costal para sternal gauche pour obtenir un court axe basal du VG (BASAL). Répéter la manœuvre en plaçant l’image de la portion moyenne (muscle papillaire) du VG au centre de l’écran effectuez la rotation pour obtenir un court axe du VG au niveau des muscles papillaires (MID) et remonter sur le grill costal para sternal gauche. Répéter la même procédure pour l’apex (APICAL). Cette technique est utile chez les patients avec réverbérations et dédoublement du VG occasionnellement visualisé en sous costal. L’autre avantage c’est l’absence du foie en général devant le cœur a ce niveau. Le patient doit tenir une inspiration forcée comme en sous costal. Le patient en décubitus latéral gauche prononcé est la meilleure position pour le costal sous costal
Cinquième choix :
A partir du Para sternal droit (ou costal sous costal droit)
Placez le patient en décubitus latéral droit extrême et demandez au patient d’expirer profondément et de retenir sa respiration ainsi. Débutez en trouvant la valve aortique court axe en para sternal droit par la suite anguler la sonde vers la gauche, vers le VG pour obtenir un court axe du VG basal (BASAL). En angulant plus vers la gauche ou déplaçant la sonde on peut obtenir un court axe MID et APICAL.
B) COURT AXE DU VENTRICULE DROIT
En appliquant la même technique d’ horizontalisation du VG au VD obtenir un VD 2C. Le VD 2C doit être le plus horizontal possible sans la présence de l’aorte ni de la valve pulmonaire dans l’image. Centrez la base du 2C VD au centre de l’écran et tournez a 90 degré horaire et vous allez obtenir un court axe du VD-VG mais centré sur le VD (BASAL). Cette technique est particulièrement favorable pour l’analyse segmentaire des parois du VD. Répétez la technique pour la portion MID et APICALE du VD. Le court axe apical du VD est le troisième choix après le para sternal gauche et le 4C apical pour bien voir l’apex du VG.
C) LE VRAI 2C APICAL DU VG
Localisez votre court axe VG au niveau basal (mitral) . Observez et mémorisez la position de la commissure antérieure mitrale . C’est habituellement vers 3 heure. Retournez à votre 4C classique apical l’apex du VG étant a droite de l’écran. Tournez lentement antihoraire pour aller vers le 2C classique apical. La première étape de cette rotation est le 4C avec VD diminué .Cette incidence avec le sous costal est très utile pour confirmer des anomalies de contractilité ventriculaire gauche au niveau du septum inférieur. Dans cette incidence vous aller noter que la valve mitrale a 3 feuillets P1, A2 et P3. Si vous continuez votre rotation antihoraire vous aller faire disparaitre le VD et tomber dans un 2C VG avec 3 feuillets mitraux P1 , A2 et P3. En continuant la rotation antihoraire vous aller obtenir un 2C VG avec 2 feuillets A2 ,P2 (vous êtes entre 12h et 3h) . En complétant votre rotation vous obtiendrez votre 3C VG apical classique avec 2 feuillets A2, P2. En fait la meilleure technique pour obtenir un ¨ vrai 2C VG¨ avec A2, P2 est de faire un retour vers le 2C VG 2 feuillets a partir du 3C VG c'est-à-dire une rotation horaire a partir du 3C VG.
N.B. : Dans toutes ces suggestions la meilleure image peut être acquise en inspiration ou expiration ou en respiration libre. Pour chaque patient vous devez choisir quelle phase du cycle respiratoire vous donne la meilleure image même si c’est parfois inhabituel.
Le lien ci-dessous vous dirigera vers une vidéo de 15mt avec des exemples de cas d’échocardiaque 2D expliquant les techniques décrites ci haut : www.drlebeau.info (a systematic approach…)
Dr Réal Lebeau Échocardiographie
Hôpital Sacré-Cœur
Montréal
Sincères remerciements au Dre Maria Di Lorenzo pour sa précieuse collaboration et a M. Jonathan Béland pour ses grandes habiletés en vidéo production et post production. Remerciements aux techniciennes de notre labo pour leur collaboration a la production de ce texte : Samia Guerboukha pour sa revision du texte, Alexandra Servant Lauzon, Karolane Michel et Claudia Lachance pour leurs suggestions et leur expertise technique.
*Les heures correspondent a un cadran horaire virtuel sur la carte polaire décrivant le VG. :2Hr jonction paroi antérieure et antérolatérale. 4Hr jonction paroi antérolatérale et inférolatérale. 8Hr jonction paroi inférieure et septum inférieur et 10Hr jonction du septum inférieur et du septum antérieur. CF. : WWW. Drlebeau.info ( Presentation WMS)
Octobre 2015